The Perfect Image Size for Instagram Post Success
When you're aiming for that crisp, professional look on your Instagram feed, getting the image size right is step one. The sweet spot is a width of 1080 pixels. From there, your height can range anywhere between 566 and 1350 pixels, depending on the orientation you're going for.
If you really want to maximize your screen real estate and grab attention, the portrait orientation at 1080 x 1350 pixels is the way to go. It takes up the most space on a user's screen as they scroll, making your content much harder to miss.
Your Instagram Image Size Quick Reference Guide
We've all been there: you upload a fantastic photo, only to have Instagram crop it weirdly or compress it until it's a blurry mess. This happens when the dimensions aren't optimized for the platform. Using the correct sizes ensures your images stay sharp, clear, and appear exactly as you intended. It's not just about aesthetics; it's about giving your content the best possible chance to perform well.
This visual guide breaks down the essential image sizes for the most common Instagram formats. Think of it as your first stop for getting things right.
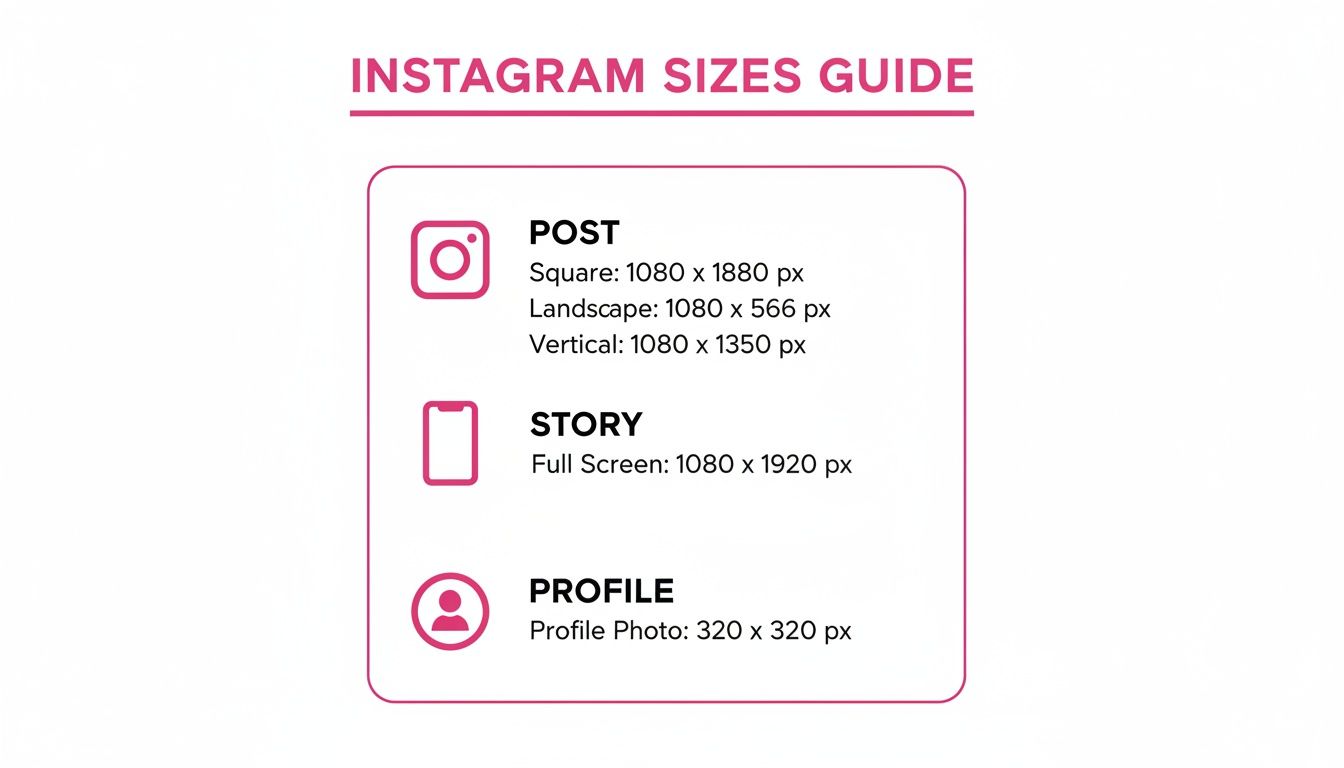
As you can see, every content type—from your profile picture to your Stories—has a specific shape and size it needs to fit perfectly within its designated spot.
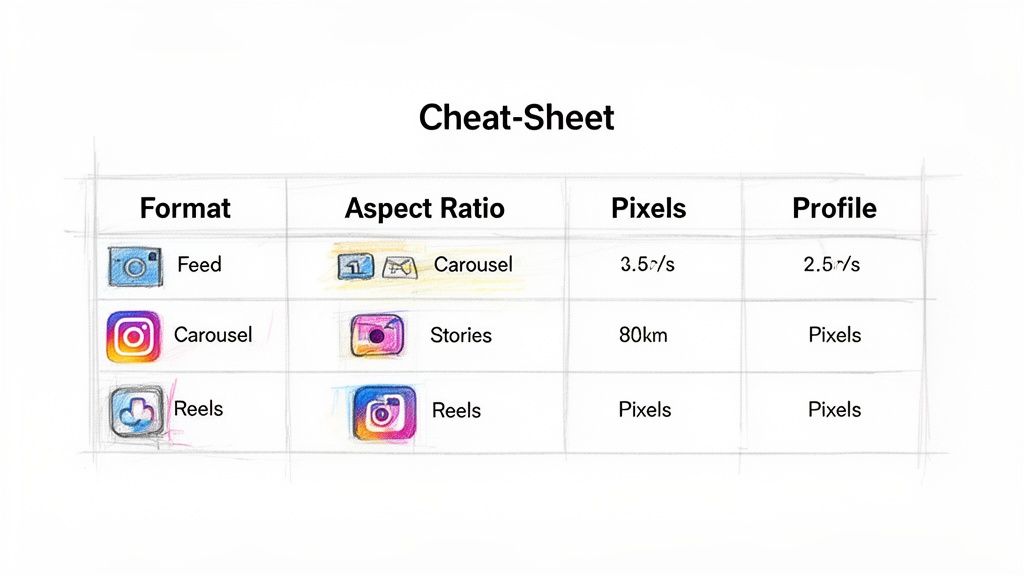
A Cheat Sheet for Perfect Sizing
To make it even easier, I've put together a simple reference table with all the up-to-date dimensions. Bookmark this page and treat it as your go-to guide for sizing everything you create for Instagram.
Instagram Image and Video Dimensions
Here's a comprehensive summary of recommended pixel dimensions and aspect ratios for all major Instagram content types. Keep this handy, and you'll never have to guess again.
| Content Type | Recommended Width | Recommended Height | Supported Aspect Ratio(s) |
|---|---|---|---|
| Profile Photo | 320 px | 320 px | 1:1 |
| Feed Post (Square) | 1080 px | 1080 px | 1:1 |
| Feed Post (Portrait) | 1080 px | 1350 px | 4:5 |
| Feed Post (Landscape) | 1080 px | 566 px | 1.91:1 |
| Instagram Story | 1080 px | 1920 px | 9:16 |
| Reels & Reel Covers | 1080 px | 1920 px | 9:16 |
This table covers the essentials for ensuring your content looks its best across the platform.
My biggest piece of advice? Always start with a width of 1080 pixels. This is the magic number Instagram prefers, and it helps prevent any aggressive compression or resizing that degrades your image quality. Whether you're crafting a square, portrait, or landscape post, locking in that width is the most important step.
Understanding Aspect Ratio and Resolution
If you want to nail the perfect image size for your Instagram posts, you first have to get a handle on two core concepts: aspect ratio and resolution. These two elements are the building blocks of every great post, working together to decide how your photos show up in the feed. Getting them right is the secret to avoiding weird crops and blurry photos.
Think of aspect ratio as the shape of your image. It's the proportional relationship between its width and height, usually written out like 1:1 for a perfect square or 9:16 for a tall, vertical story. This ratio dictates the image's shape, not its actual size in pixels.
For example, a photo with a 4:5 aspect ratio is always going to be taller than it is wide, no matter if it's a tiny thumbnail or a massive print.
Why Aspect Ratios Matter on Instagram
Instagram is really particular about the shapes it allows for different types of content. If you try to upload an image with an unsupported aspect ratio, the app will just crop it for you, which is usually how the best part of your photo gets chopped off.
Here are the key ratios you need to know:
1:1 (Square): The classic, original Instagram look.
4:5 (Portrait): The best choice for feed posts, since it takes up the most vertical real estate on the screen.
1.91:1 (Landscape): Perfect for those wide, horizontal shots.
9:16 (Vertical): The full-screen standard for Stories and Reels.
Sticking to these predefined shapes is the only way to make sure your content appears exactly how you designed it.
The Role of Resolution and Image Quality
While aspect ratio sets the shape, resolution determines the detail. Measured in pixels (px), resolution is just the number of tiny dots that make up your image. When it comes to Instagram, the magic number for an image's width is 1080 pixels.
When you upload a photo that's 1080px wide, you're telling Instagram it's already optimized. If you upload something bigger, Instagram's aggressive compression algorithm will shrink it down, which often leads to a noticeable drop in sharpness. On the flip side, if your image is smaller than 1080px wide, Instagram has to stretch it to fit, causing that dreaded pixelated, blurry look.
Key Takeaway: Always export your images with a width of 1080px. This is the single most important step you can take to keep your photos crisp and fight back against Instagram's heavy-handed compression.
By pairing the right aspect ratio (the shape) with the optimal resolution (the detail), you're creating a perfectly formatted image. This combo is what makes your content look polished and professional, helping you stand out in a ridiculously crowded feed.
The Best Dimensions for Instagram Feed Posts
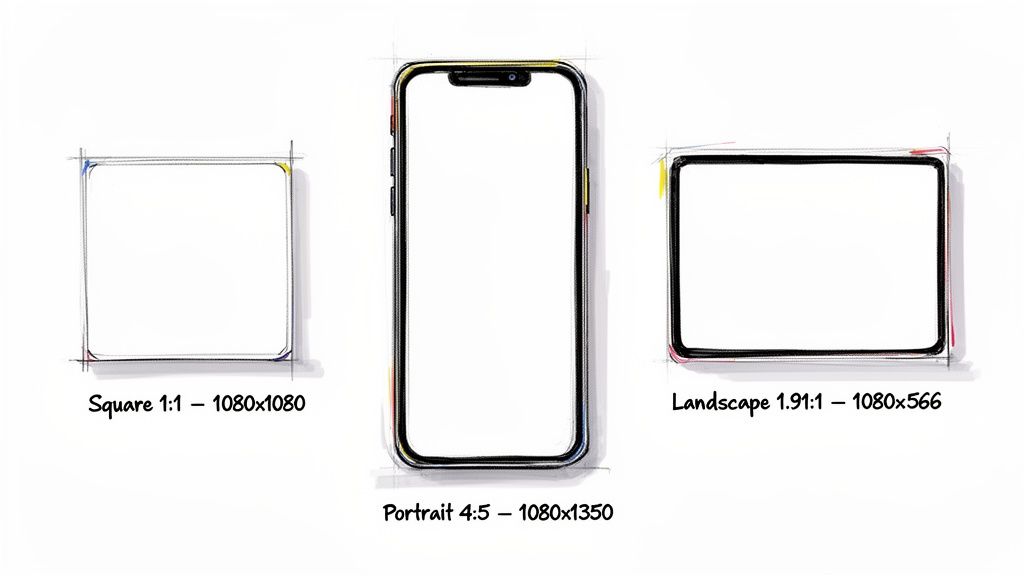
When you're putting together a single-image feed post, you really have three options: Square, Portrait, and Landscape. Each has its own strategic use, but one format consistently grabs more attention than the others. Getting the hang of these different image sizes is a game-changer for making your content pop.
The sweet spot for any feed post is to keep the width at 1080 pixels. The height can range from 566 pixels for a wide landscape (1.91:1) all the way up to 1350 pixels for a tall portrait (4:5).
Hands down, the 4:5 portrait (1080 x 1350 px) is the winner. It's been shown to outperform square posts by a whopping 40% in reach. Why? Because it takes up more screen real estate, holding a user's attention for an average of 2.3 seconds longer. Posts at 1080 x 1350 px also get 18% higher save rates than smaller images, making it the clear choice for boosting engagement.
The Power of Portrait Mode (4:5)
The Portrait orientation, with its 4:5 aspect ratio and 1080 x 1350 pixel dimensions, is your most powerful tool for feed posts. Its biggest advantage is simple: it fills up the most vertical space on a phone screen as people scroll. This extra real estate makes your content more prominent and much harder to just flick past.
It's a straightforward but effective principle of user behavior. Taller images command more visual territory, which translates directly into people spending more time looking at your post and being more likely to interact with it. When your post fills the screen, it creates a more immersive feel, giving people a reason to pause.
Classic Square Posts (1:1)
The classic Square post (1:1 aspect ratio, 1080 x 1080 pixels) is where it all started for Instagram, and it's still a perfectly good, safe choice. It gives you a clean, symmetrical look that fits perfectly into your profile grid without any awkward cropping.
While it doesn't own the screen quite like a portrait post does, the square format is incredibly versatile and works great for all sorts of content, including:
Product shots where the subject is right in the middle.
Quotes and text graphics that need a balanced, even composition.
Brand logos or simple, direct announcements.
The main draw of a square post is its predictability. You know exactly how it will look on your grid, which is key if you're building a highly curated, organized aesthetic. Our guide on how to repost on Instagram
When to Use Landscape Posts (1.91:1)
Landscape posts, with their wide 1.91:1 aspect ratio and 1080 x 566 pixel dimensions, are the least common format, but they definitely have their moments. This wider orientation is perfect for panoramic scenes, big group photos, or cinematic shots where a horizontal view is non-negotiable.
A quick heads-up: While landscape posts are excellent for showing off wide visuals, they take up the least amount of vertical space in the feed. This means people can scroll past them much faster. Use this format only when the image would truly lose its impact if you cropped it into a square or portrait.
Ultimately, picking the right image size comes down to your content and your goals. If you're chasing maximum visibility and engagement, the 4:5 Portrait is the undisputed champion. But don't count out Square and Landscape posts—they offer creative flexibility when you need it.
Mastering Carousel Post Dimensions
Carousels are an incredible tool for telling a story or showing off a product line, but their sizing rules can be a real headache. Unlike a simple single-image post, carousels have a quirky "sticky" aspect ratio that dictates the format for every single slide in the sequence. Getting this right from the start is the key to avoiding frustrating, unexpected crops.
Here's the single most important rule to remember for carousels: the aspect ratio of your first slide locks in the format for every slide that follows. If you lead with a square image, Instagram will automatically crop every other photo or video in that carousel to a 1:1 frame. This is how you end up with awkward framing if you've mixed and matched different image sizes.
Recommended Carousel Dimensions
To keep your carousel looking clean and professional, you need to plan the entire thing around one of Instagram's three supported aspect ratios. No matter which you choose, always keep the width at a solid 1080 pixels to sidestep any nasty compression.
Square (1:1): This is your safest bet and the most common choice. Use 1080 x 1080 pixels for every slide. It's reliable and you never have to worry about how it will look on your profile grid.
Portrait (4:5): Hands down, this is the most engaging option. Go with 1080 x 1350 pixels for all slides to grab the most screen real estate. It's perfect for creating an immersive, vertical story that stops the scroll.
Landscape (1.91:1): You won't see this one as often, but it's useful for wide, cinematic shots. Stick to 1080 x 566 pixels consistently. Just be mindful that this format takes up the least amount of vertical space in the feed.
This rule doesn't just apply to photos; it's the same when you mix in videos. If your first slide is a 4:5 portrait photo, any video you add later in the carousel must also be 4:5, otherwise Instagram will crop it for you.
Pro Tip: Want to create that cool, seamless panoramic effect? Make one wide image (say, 2160 x 1080 pixels for a two-slide square carousel) and then use a splitting tool to chop it into separate 1080 x 1080 px tiles. It makes for a seriously impressive swiping experience.
How to Create a Cohesive Carousel
Before you even touch an editor, decide which orientation makes the most sense for your content. If you're working with a mix of vertical and horizontal photos, you have to pick one format and crop everything else to match it before you upload.
For instance, if you decide a portrait (4:5) carousel is the way to go, you'll need to pre-crop any square or landscape images to fit those 1080 x 1350 pixel dimensions. Taking this step beforehand gives you total creative control and ensures your story flows smoothly from one slide to the next, without any jarring crops. A little planning is the secret to a polished, professional-looking carousel.
Mastering Instagram Stories and Reels
Vertical, full-screen content is the name of the game on Instagram today. Both Stories and Reels are built to deliver an immersive, in-your-face experience, and to get it right, you have to nail the format. That means sticking to a 9:16 aspect ratio.
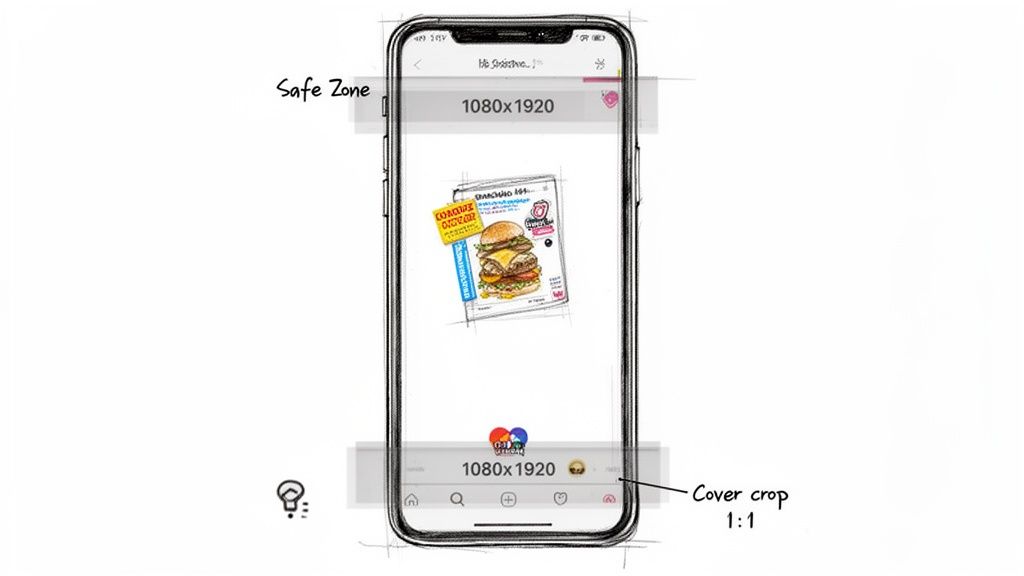
The magic numbers you're aiming for are 1080 x 1920 pixels. This resolution ensures your content fills the entire screen on a modern smartphone, avoiding those awkward black bars or weird stretching that can make viewers instantly swipe away.
Navigating Story Safe Zones
Just uploading a 1080 x 1920 image isn't the whole story, though. Instagram adds its own interface elements on top of your content, and if you're not careful, they can completely cover up the important stuff. This is where knowing your safe zones is absolutely critical.
Think of safe zones as the areas of your Story that will always be visible, no matter what. To avoid any rookie mistakes, keep all your essential text, logos, and calls to action away from the very top and bottom edges.
Top Area: Leave about 250 pixels of breathing room at the top. This space is reserved for your profile icon and username, so you don't want your main headline getting blocked.
Bottom Area: Keep roughly 340 pixels clear at the bottom. This is where the reply bar and any interactive stickers (like a link or a "Send Message" prompt) will appear.
It's a super common mistake to place text or key visuals in these no-go zones, which can make your Story look unprofessional and frustrating to read. For more tips on getting your Stories just right, check out our guide on how to schedule Instagram Stories
Sizing Your Reel Cover Photo the Right Way
Reels also live in that full-screen 1080 x 1920 pixel world, but their cover photos are where things get tricky. The cover is the thumbnail that represents your Reel across the app, and Instagram crops it differently depending on where it's shown.
Important Note: A single Reel cover photo appears in three different places, each with its own aspect ratio. Your job is to design one image that looks great in all three views.
The full 9:16 cover image is what people see when they tap on your Reel directly from your profile's Reels tab. But that same image gets automatically cropped in two other crucial spots.
Profile Grid (1:1 Crop): On your main profile grid, Instagram crops your cover down to a 1:1 square. It takes the center of your 1080 x 1920 image and displays it as 1080 x 1080 pixels. Anything outside this central square gets chopped off.
Feed Preview (4:5 Crop): When your Reel shows up in someone's main feed, it gets cropped again, this time to a 4:5 portrait view. The final dimensions here are 1080 x 1350 pixels.
The key to a perfect, all-purpose cover is simple: place your main subject, title, and any other must-see information dead center in your 1080 x 1920 canvas. This strategy ensures that nothing important gets lost when Instagram's automatic crops do their thing.
Sizing Your Profile Photo and Grid Thumbnails
Your profile photo and grid are the first things anyone sees when they land on your page. Think of them as your digital handshake—they set the tone for that crucial first impression. While it's easy to focus on individual posts, getting the dimensions right for your profile photo and understanding how grid thumbnails work are what separate a polished, professional-looking account from an amateur one.
Nailing the Perfect Profile Photo
Let's start with the basics. For your profile picture, Instagram asks for an image that's at least 320 x 320 pixels. It might seem like overkill since it only shows up as a tiny 110 x 110-pixel circle on mobile, but uploading that higher-res file is key to keeping it looking sharp and avoiding any fuzzy pixelation.
And remember, it will be cropped into a circle. So, whatever you want people to focus on—your face, your logo—make sure it's dead center. Otherwise, you risk it getting awkwardly sliced off.
Planning for the Modern Profile Grid
Moving beyond the profile photo, the way your grid thumbnails come together is what creates that "wow" factor. For years, we all got comfortable with the perfect 1:1 square preview for every post. You could design a feed knowing exactly how it would look. But Instagram threw a wrench in the works.
The platform recently started shifting the grid preview from that classic square to a taller aspect ratio for certain posts. This change has caught a lot of creators off guard, suddenly cropping their perfectly composed 4:5 portrait posts. It's all part of Instagram's big push toward vertical, mobile-first content, which consistently drives more engagement than squares.
This means planning your feed's aesthetic is more critical than ever. You have to think about how your portrait and landscape images will look after being center-cropped for the grid thumbnail.
Here's how to stay in control:
Keep a Central Focus: Make sure the most important part of your image is right in the middle. That way, when the grid automatically crops it, the subject is still front and center.
Use a Preview Tool: Don't just post and pray. Using a grid planning tool lets you see exactly how your photos will line up next to each other before you hit publish. If you're looking for one, you might find our free Instagram feed preview tool useful.
Getting your image sizes right is a huge piece of the puzzle, but a truly complete Instagram strategy also masters video. To get a full rundown on Instagram video length limits for Reels, Stories, and your feed, a dedicated guide is a must. When you've got both your images and videos dialed in, every piece of content you share will contribute to a flawless-looking profile.
Best Practices for Exporting and Uploading Images
Nailing the perfect image dimensions is a huge step, but the final quality of your post really comes down to your export and upload settings. Instagram's compression can be brutal, and it will quickly undo all your hard work if you don't prep your files correctly. By following a few best practices, you can make sure your images show up on the platform looking just as sharp and vibrant as you intended.
The two most important things to get right are your file format and color space. These little technical details have a massive impact on how Instagram processes and displays your image.
Choose the Right File Format
You'll mainly be dealing with two file formats: JPEG and PNG. They might look the same at a glance, but they're built for very different jobs, and picking the right one is your first line of defense against a blurry post.
JPEG (or .jpg): This should be your go-to for pretty much all photographs. JPEGs are designed to handle complex colors and fine details efficiently, giving you a high-quality image with a relatively small file size. Since Instagram loves fast-loading content, this is almost always the best choice.
PNG (or .png): Only use this format for graphics with sharp lines, text, or transparent backgrounds—think logos or infographics. PNGs keep those hard edges clean without the fuzzy artifacts JPEGs can sometimes create. The trade-off is a much larger file, which often triggers even more aggressive compression from Instagram.
For the vast majority of what you post, a high-quality JPEG strikes the perfect balance between visual clarity and file size. It's your best bet for avoiding a pixelated mess.
Essential Export Settings
It doesn't matter if you're using Photoshop, Lightroom, or Canva—your export checklist should always include the same key items. Paying attention to these details can make all the difference in how your image size for Instagram post looks in the wild.
Key Takeaway: Always, always export your images in the sRGB color space. Instagram converts everything to sRGB anyway. If you upload a file in a different profile (like Adobe RGB or ProPhoto RGB), the colors can end up looking washed out or just plain wrong after Instagram is done with them.
Here are the ideal settings to dial in:
File Format: JPEG
Quality/Compression: Set this between 70-90%. This range is the sweet spot; it shrinks the file size enough to please the algorithm without any noticeable drop in visual quality. Setting it to 100% just creates a needlessly large file that Instagram will compress heavily anyway.
Color Space: sRGB
Width: 1080 pixels (this is the magic number for all feed posts).
If you're a Lightroom user looking to get every last drop of quality, digging into the best export settings for Lightroom to Instagram will help you combat compression and keep your images looking crisp.
How to Upload Without Losing Quality
Finally, think about how you get the image from your computer to your phone. It might seem trivial, but messaging apps and even Airdrop can sometimes apply their own layer of compression, degrading your file before you even open Instagram.
To protect every single pixel, use a cloud service like Google Drive, Dropbox, or WeTransfer to move your final files. This guarantees that the file you're uploading is the exact high-quality version you so carefully exported. Using a scheduling tool can also help preserve quality while streamlining your workflow; you can learn more about how to schedule Instagram posts
Got Questions About Instagram Image Sizes? We Have Answers.
Let's be honest, navigating Instagram's weird formatting rules can feel like a guessing game. Even when you think you've followed the guidelines, you might still run into annoying quality issues or unexpected cropping. This section is your go-to troubleshooting guide for the most common headaches creators face with Instagram image sizes.
We'll break down everything from why your photos look blurry to the nitty-gritty of aspect ratios. Think of this as the expert advice you need to get your content looking sharp and professional every single time.
How Do I Stop Instagram from Ruining My Image Quality?
Instagram is all about speed, which means it compresses every single image you upload. To keep your photos looking crisp, your job is to give its compression algorithm as little work as possible. The single best thing you can do is upload images with a width of exactly 1080 pixels.
If your image is wider, Instagram's aggressive compression will shrink it down, often creating softness or weird digital artifacts. On the flip side, if your photo is too small, the app will stretch it out, making it look pixelated.
Pro Tip: It's not just about the pixels. How you get the file onto your phone is a huge deal. Never use messaging apps like Messenger or WhatsApp to transfer photos from your computer—they add their own nasty layer of compression. Instead, use a cloud service like Google Drive, Dropbox, or AirDrop to move your finished JPEG without wrecking its quality.
What's a Good Image Size for an Instagram Post?
While you have a few options, the most strategic and effective size for a standard feed post is the Portrait orientation at 1080 x 1350 pixels. This is a 4:5 aspect ratio.
Why is it the best? Simple: it takes up the most vertical real estate on a phone screen. When someone is scrolling, a taller image is more commanding and harder to just flick past. This can directly lead to longer view times and better engagement. Sure, Square (1:1) and Landscape (1.91:1) posts still work, but the 4:5 Portrait format gives your content a serious competitive advantage in a crowded feed.
Why Does My Instagram Post Look Blurry?
Blurriness is almost always a direct symptom of Instagram's compression algorithm working overtime. A few common culprits are usually to blame for triggering this.
Wrong Width: As we covered, uploading an image wider than 1080px forces Instagram to shrink it aggressively. If it's much smaller, the app stretches it out. Both look bad.
Bad File Format: Always, always use JPEG for photographs. PNG files are much larger and are meant for graphics with sharp lines, which can make Instagram's compression work way too hard.
Incorrect Color Profile: Make sure your image is saved with an sRGB color profile. Using other profiles can cause strange color shifts and degradation when you upload.
File Transfer Squeeze: I'll say it again—sending the photo to yourself through a messaging app can destroy its quality before it even touches Instagram's servers.
Get these four factors under control, and you'll dramatically cut down the chances of your posts looking blurry or pixelated.
Can I Post a 16:9 Photo on Instagram?
Nope, not without it getting cropped. The widest aspect ratio Instagram supports for a landscape photo in the feed is 1.91:1.
If you try uploading a standard 16:9 widescreen photo (like a still from a video), Instagram will immediately force you into its cropping tool, and you'll lose parts of your image. To keep control, you should pre-crop your 16:9 image to the 1.91:1 aspect ratio before you upload. For an image that's 1080px wide, this means the height should be just 566 pixels. This is the only way to guarantee what you see in your photo editor is exactly what your audience sees in their feed.
Ready to turn your Instagram engagement into real revenue? With happydms, you can automate your direct messages, comments, and post scheduling to build stronger connections with your followers effortlessly. Start converting your audience into customers today!